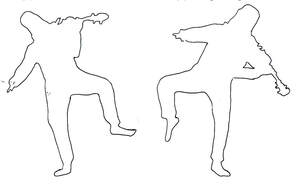
RESOURCES
Somatic movement exercises designed for musicians, to try by yourself, with peers and students
Thigh lifts and scale playing
INTRODUCTION
Musicians generally stand on two feet whilst playing (unless they are sitting, but that’s another story). This series of exercises challenges the idea that stability requires two feet on the ground.
It suggests that challenging balance and coordination actually increases stability through the increased freedom of movement encouraged in playing.
This series offers the opportunity to sense your core (defined as: the bit between your legs, between your legs and your ribs, the bit where your belly button is). By ‘core support’ we mean it activates, it doesn’t leave the party. But in this series of actions, the core activates through movement, rather than through stillness (like holding a ‘plank’ position. This is also very strengthening and advised if you’re getting a lot of back pain). Mobilizing core support whilst playing, though, will set up the muscle memory of what core support means in your work, not just as something you do when doing sit-ups.
This exercise is interested in varying levels of simplicity and complexity, woven together in ways that support you and challenge you. Ideally, playing will become more supported, easier, maybe more pleasurable.
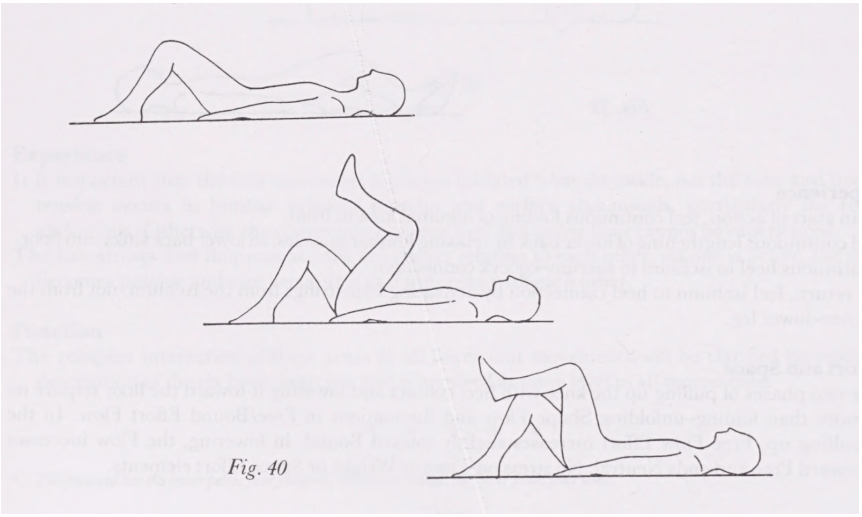
THE CLASSIC THIGH LIFT EXERCISE
Taken from Irmgard Bartenieff with Dori Lewis, (1980) Body Movement: Coping with the environment. Gordon and Breach Publishers, New York, Paris, London. p.236 - 237
Purpose: To raise the thigh through iliopsoas initiation and deep folding of the inguinal area [or groin, the junctional area between the torso and the thigh] which causes a pure thigh flexion movement. To become aware of the graded pelvic tilt.
Action: Lie back in knees-up position [supine hook position]. (See Pre-Lift.)
Exhale and begin hollowing abdomen to initiate the movement of leading with the top of the knee to the thigh toward the chest, maintaining the same amount of flexion in the knee. Return to the starting position.
Why does this matter? The pair of iliopsoas muscles are the only muscles connecting your legs to your torso. Their strength and flexibility matters for everything from walking, sitting, getting out of bed, running for a bus to skipping for joy
BEFORE STARTING
things to pay attention to
things to pay attention to
- Take your time to feel, sense, and listen to your body.
You can do one exercise at a time, try them all at once,
or gradually build up your stamina and progress step by step through exercises 1 to 6
- Starting position: stand in a relatively narrow position, feet apart about the width of your fist.
- Always remember to breathe; at times, it's helpful to breathe with your mouth open.
- Lifting or lowering the thigh should be done over 2 beats in a chosen tempo, like 56 beats per minute.
There's no need to increase speed after you're familiar with the exercise,
but its always recommended to experiment with your own pace.
- The highest point of lifting your thigh should feel comfortable and stable.
You can gradually lift higher, but be sure to maintain stability and control your speed of action,
thus keeping a consistent tempo of motion throughout.
- Between each direction - forward, side and back -
bring your foot back to to the floor before proceeding to the next direction.
- Be mindful of the tension and relaxation levels in different parts of your body,
such as the neck, head, feet, and shoulders.
You can release tension in your head through gentle, subtle movements while playing.
- When your body feels strained and tired, take a break:
pause, shake, laugh, stretch, rotate, or move in a way that feels comfortable.
You can also change your posture—lie down, sit,
or stand—or do something different from the exercise itself.
- After completing an exercise, it's recommended to play 'normally' (improvise or perform repertoire)
and experiment freely with the new movements you learned.
LOWER BODY
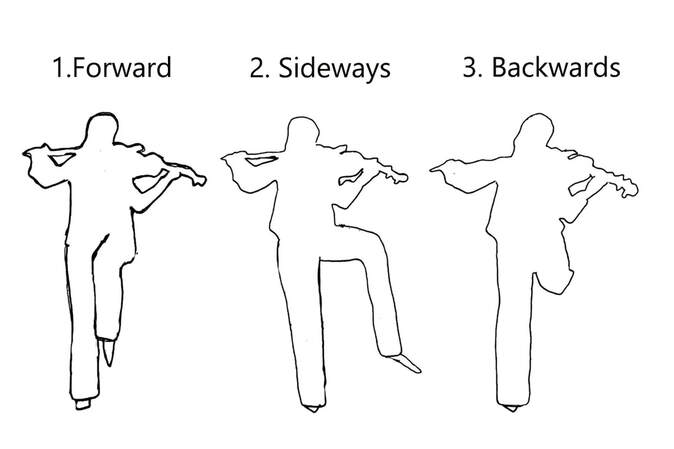
1. 3 directions:
forward, sideways and backwards.
All movements on one side first (eg. Left), then the other side
forward, sideways and backwards.
All movements on one side first (eg. Left), then the other side
Instructions:
Lift your left thigh forward - 2 beats
Lower it back to the floor - 2 beats
Lift to the left side and lower back to the floor
Lift backwards and lower back to the floor
Lift to the left side and lower back to the floor
Same with the right leg (forward - sideways - backwards - sideways)
Lift your left thigh forward - 2 beats
Lower it back to the floor - 2 beats
Lift to the left side and lower back to the floor
Lift backwards and lower back to the floor
Lift to the left side and lower back to the floor
Same with the right leg (forward - sideways - backwards - sideways)
- This exercise helps you learn the three basic directions—forward,
sideways, and backward—in a simple way. You'll practice one side and then the other.
The leg on the other side, which is the stable standing leg, may feel tired after a while.
Make sure to shake or stretch it when needed.
sideways, and backward—in a simple way. You'll practice one side and then the other.
The leg on the other side, which is the stable standing leg, may feel tired after a while.
Make sure to shake or stretch it when needed.
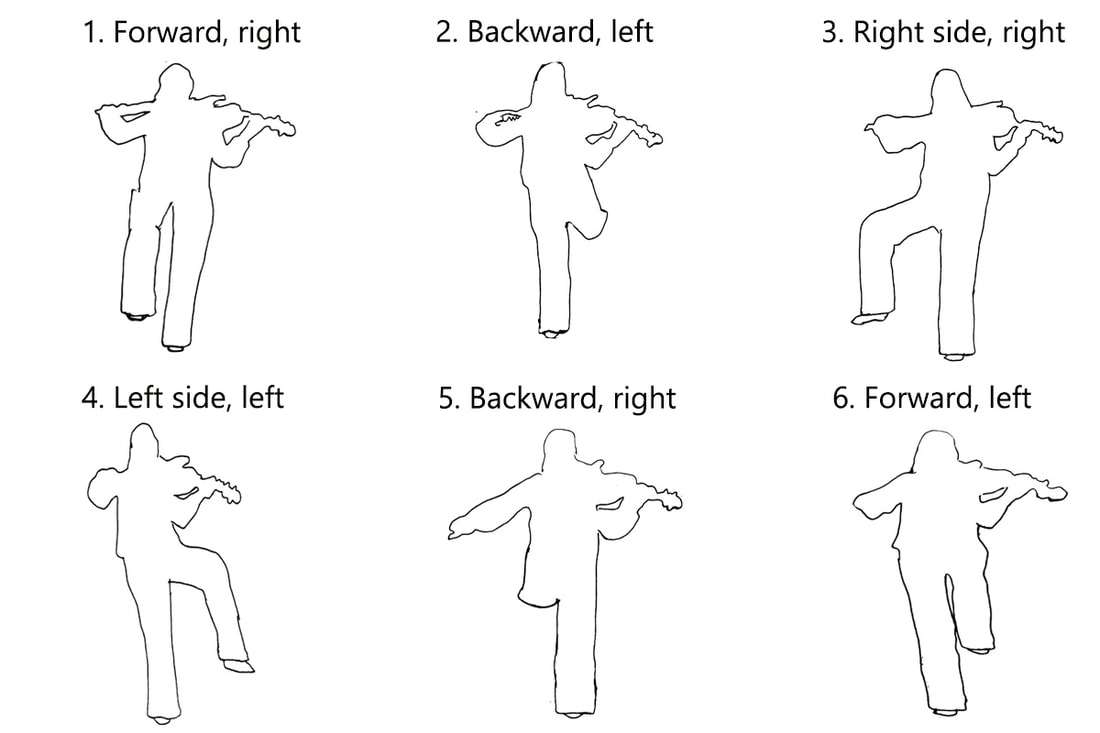
2. 3 directions, alternating Left-Right
Instructions:
Lift your right thigh forward - 2 beats
Lower it back to the floor - 2 beats
Lift your left thigh backwards and lower it back to the floor
Lift the right thigh to the right side
Lift the left thigh to the left side
Lift the right thigh backward
Lift the left thigh forward
Lift the right thigh to the right side
Lift left thigh to the left side
EXPLANATION: This exercise involves constant alternation
between the right and left leg and between forward and backward movements.
ATTENTION:
- Observe how this alternation affects the distribution of weight on
and with the instrument and how it influences the sound produced.
- Note that each time you switch legs, you also shift your weight to the standing leg,
which is important for stability.
- While moving between front and back and right and left,
imagine a connecting line between the two legs for a sense of continuity.
- As you learn to mobilize and strengthen through coordinating different movements,
expect to experience periods of instability.
With practice, shifts in weight, stamina, and focus will become smoother.
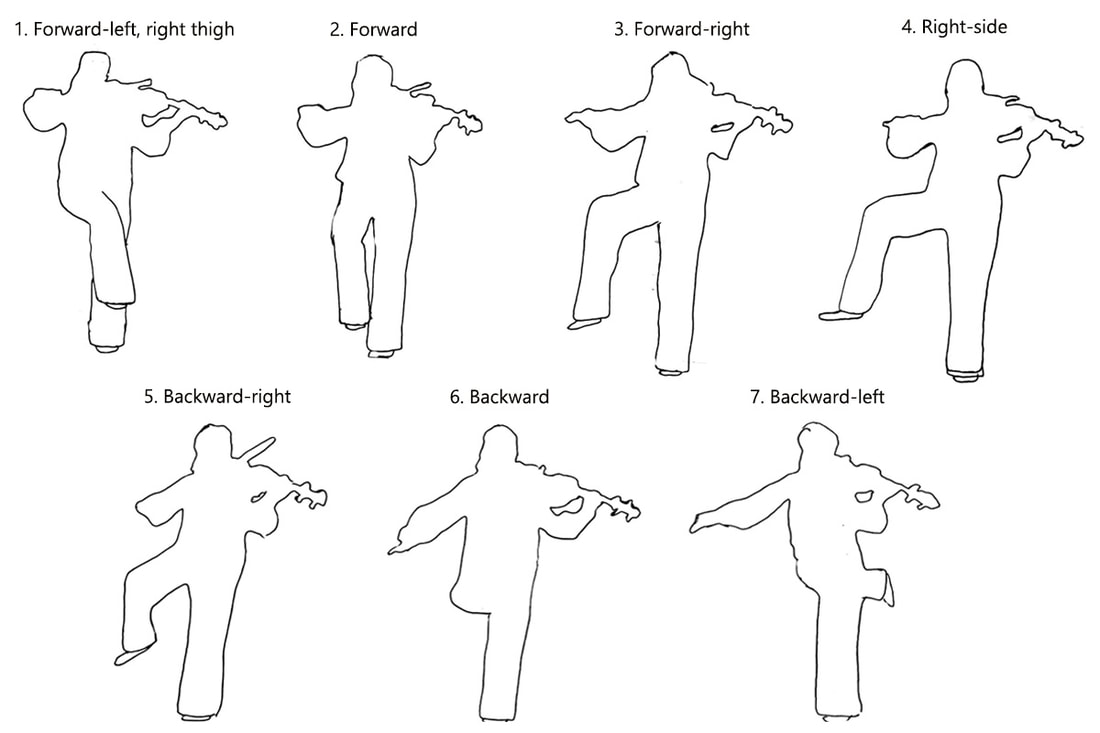
3. 7 directions:
all movements on one side first (eg. Left),
then the other side.
all movements on one side first (eg. Left),
then the other side.
Instructions:
1st direction: Lift your right thigh forward and left - 2 beats
Lower it back to the floor - 2 beats
2nd: Lift forward and lower it back to the floor
3rd: Lift forward and right and lower it back to the floor
4th: Lift to the right side and lower it back to the floor
5th: Lift backward and right and lower it back to the floor
6th: Lift backwards and lower it back to the floor
7th: Lift backwards and left and lower it back to the floor
Play one nots (4 beats) standing still or while bending your knees
Reverse - repeat all 7 directions, from the back to the front
EXPLANATION: This exercise is for learning more directions other than the 3 basic directions. Between each direction one ‘sub’ direction is added.
This allows you to explore different movement angles of the pelvic and the thigh muscles,
as well as more angles in the relationship between the lower and upper body.
It might also challenge stability.
SUGGESTION: You experiment with playing something else while practicing this exercise,
for example a fast tempo etude or something that is rhythmical.
How is this different from playing long sustained notes?
How does it affect your balance and stability?
How is the connection of the bow with the string affected?
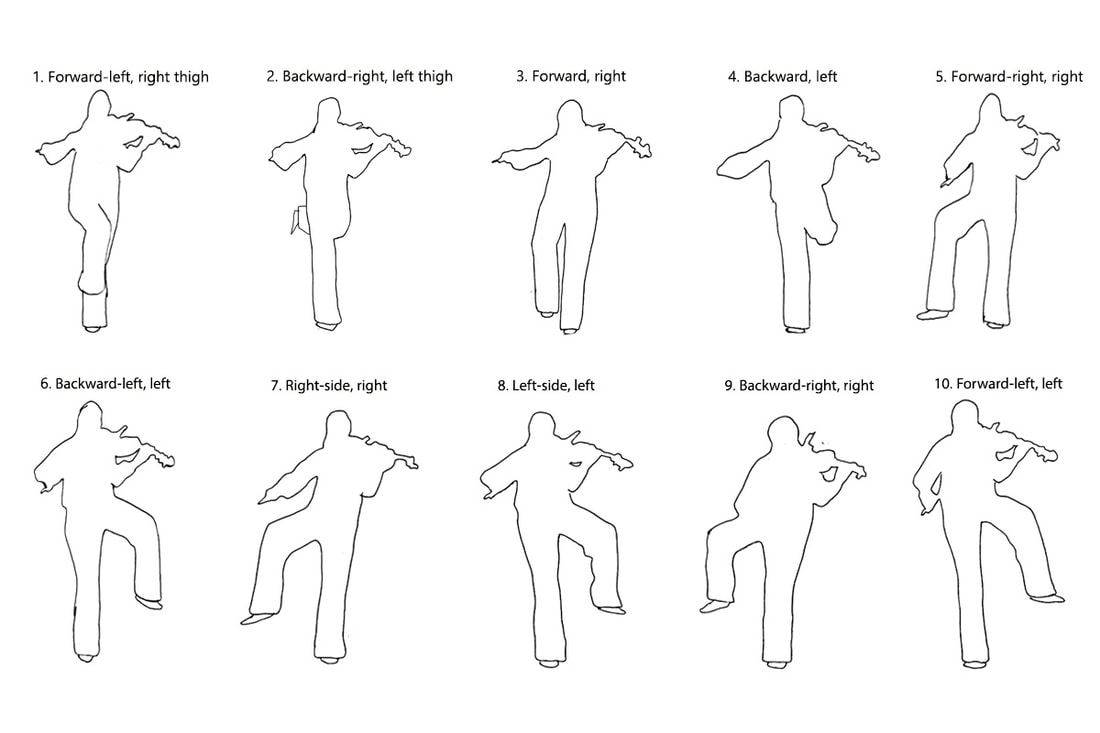
4. 7 directions,
alternating Right-Left
alternating Right-Left
Instructions:
Lift your right thigh forward and left - 2 beats
Lower it back to the floor - 2 beats
Lift your left thigh backwards and right, and lower it back to the floor
Lift your right thigh forward
Lift your left thigh backwards
Lift your right thigh forward and right
Lift your left thigh backwards and left
Lift your right thigh to the right side
Lift your left thigh to the left side
Lift your right thigh backward and right
Lift your left thigh forward and left
Lift your right thigh backward
Lift your left thigh forward
Lift your right thigh backward and left
Lift your left thigh forward and right
Reverse - start from right-backward-left and left-forward-right and make your way back.
EXPLANATION: In this exercise you alternate constantly between the right leg and the left leg, and also between forward and backward and the other 6 directions.
ATTENTION: While alternating between one leg to the other you can imagine that a line is created - sometimes a straight line (forward to backward) or a diagonal line (forward-right to backward-left). You can think or feel how these lines correlate, compliment or contrast the movement of your bow.
And if and when do they support the balance and relationship between your left and right arm.
SUGGESTION: At the first times of practicing these exercises it is
recommended to let your sound and tone be what it is at the moment.
Thus, to not necessarily ignore but to ‘put aside’ critical thoughts about tuning and quality of sound, which might be affected by the new way of moving you are learning.
You want to allow yourself to explore and experiment,
and to do that you need to let something change,
even if momentarily and even if its not ‘usually’ how you would sound like.
UPPER BODY
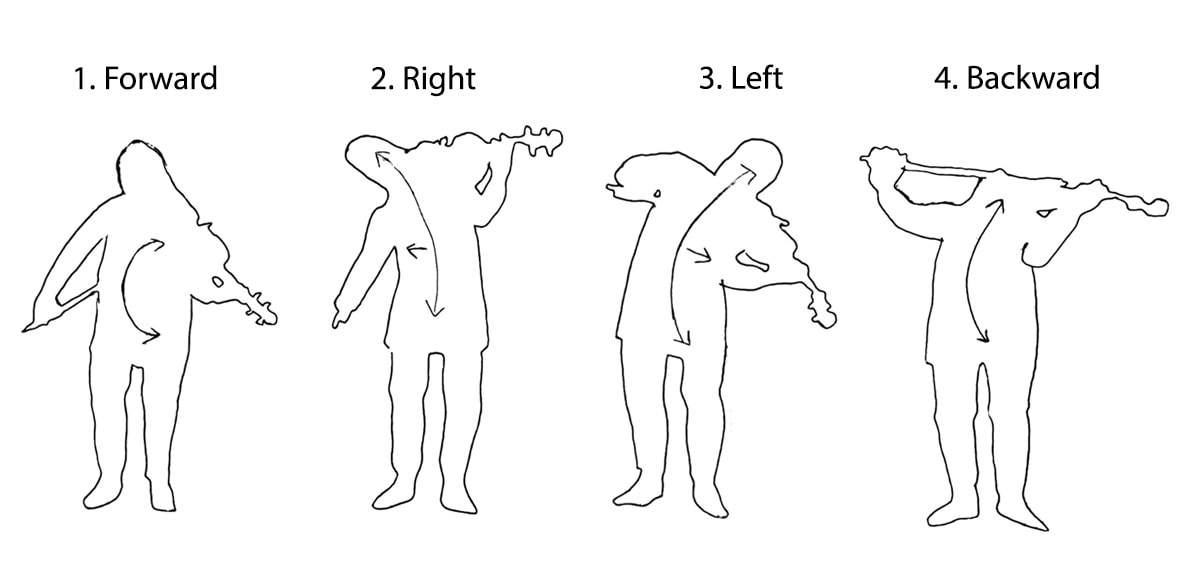
5. Forward-side-backwards,
no rotation
no rotation
Curve your upper body forward, and bring it back to the center
Curve to the right
Curve to the left
Curve backward
Curve to the right
Curve to the left
Curve to the right
Curve to the left
Curve backward
Curve to the right
Curve to the left
EXPLANATION:
- In this exercise the focus is on the UPPER BODY: from the pelvic upwards.
- We learn the 4 basic directions with the upper body: forward, right-side, left-side, backward.
- What curves in that direction is the SPINE.
You can imagine that it is creating a C-shape curve in each direction,
starting from the lowest part of the spine - lumbar spine and all the way up to the cervical spine.
- It's important that the movement of the spine continues and connects with the head,
which curves in the same direction as the spine.
VIOLIN/VIOLA: If you’re playing a violin or viola this means that your head might disconnect or change its usual contact point with the instrument.
This is welcome. Although it might be challenging.
EXPLORATION: As this exercise uses the upper body directly, you will notice more clear changes in how you hold your instrument, in the position of the bow on the strings - which will create changes in sound color and quality and in the connection between the left hand and the fingerboard. Even though these changes might be new and uncomfortable, try to let them happen, as you might discover new ways of doing things through this discomfort.
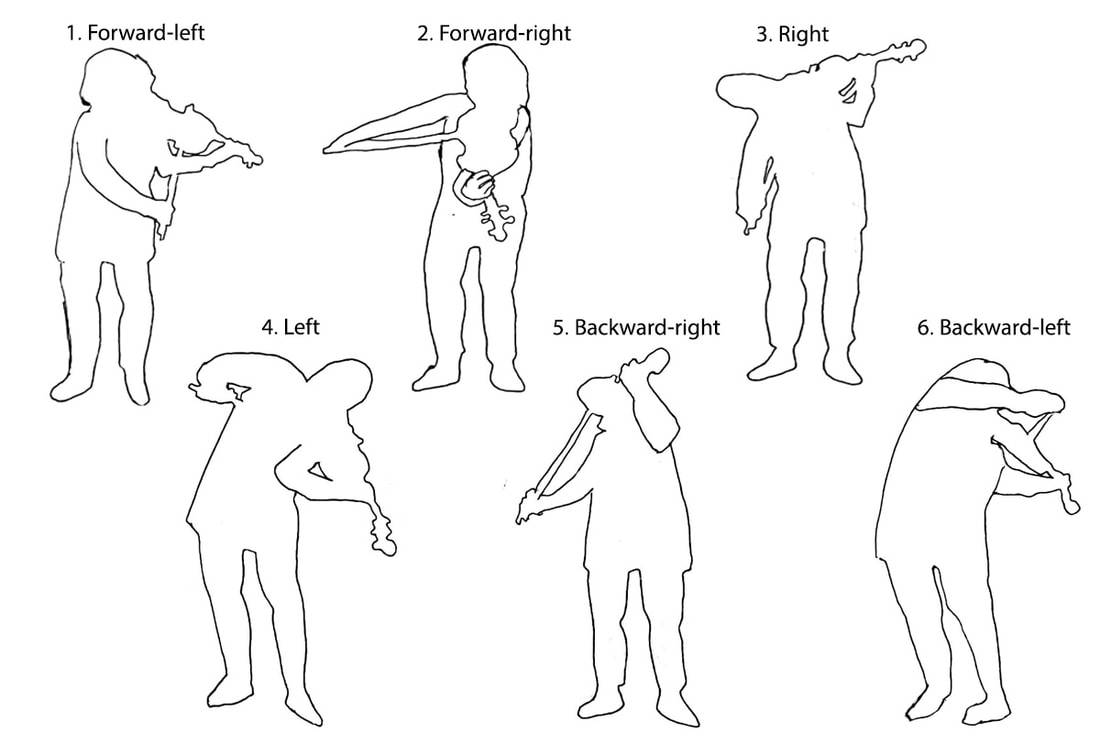
6. Forward-side-backwards with rotation, left right alternating
Curve your upper body forward and left
Curve forward and right
Curve to the right
Curve to the left
Curve backward and right
Curve backward and left
Curve to the right
Curve to the left
Ending: circe
Curve forward and right
Curve to the right
Curve to the left
Curve backward and right
Curve backward and left
Curve to the right
Curve to the left
Ending: circe
EXPLANATION: In this exercises a rotation is added to 2 of the 3 basic directions - the front and nack. So, for example, while curving forward, you also curve to the right. You can visualize your spine curving like a string that your holding on two sides and twisting each side to the opposite direction.
ATTENTION: Same as in the previous exercise,
here too its important to let the head curve and rotate as a continuation of the spine.
SUGGESTION: It can be supportive if you bend your knees while curving and rotating
(also relevant to the previous exercise).
ATTENTION: Same as in the previous exercise,
here too its important to let the head curve and rotate as a continuation of the spine.
SUGGESTION: It can be supportive if you bend your knees while curving and rotating
(also relevant to the previous exercise).
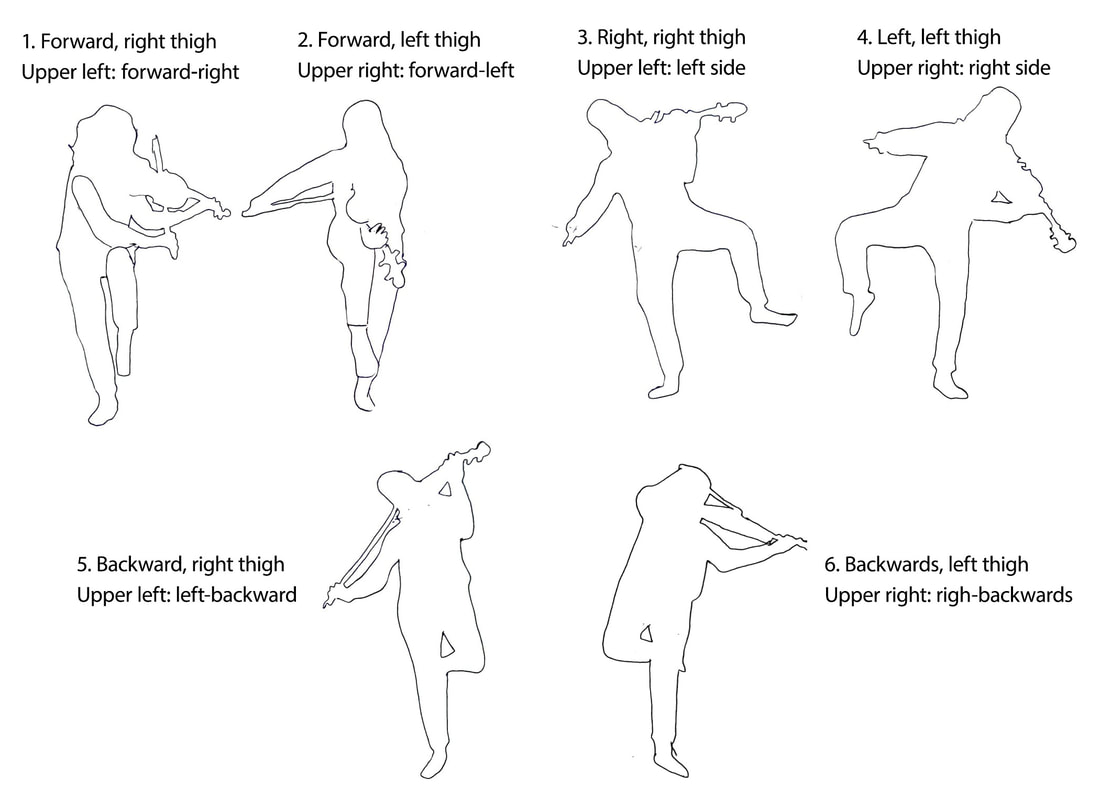
7. 3 directions, combining upper-lower, opposites
Instructions:
Lift your right thigh forward AND curve the left side of your upper body forward and right
lift your left thigh forward and curve the right side of your upper body forward and left
lift your right thigh to the right side and curve the left side of your upper body to the left
lift your left thigh to the left side and curve the right side of your upper body to the right
lift your right thigh backwards and curve the left side of your upper body backwards and right
lift your left thigh backwards and curve the right side of your upper body backwards and left
lift your right thigh to the right side and curve the left side of your upper body to the left
lift your left thigh to the left side and curve the right side of your upper body to the right
repeat while playing the musical scale up and down

